I thought I created a tutorial for this before, but I cannot seem to find it. I was asked by another forum member to provide instructions on how to upload a screenshot, or image, or images, to this forum. So, here they are:
This forum currently has a very small image size that is allowed to be uploaded, less then 98kb, which is far smaller than a typical screenshot (printscreen). It used to be around 740kb. I have asked them to change this many times, as others have I am sure, but they are either unwilling or unable to do so?
It is not that hard to get an image, or images, into this forum even with the extremely small upload image size limit. Here are a some ways:
Note: You can right click an image in the forum and open it in a new browser tab to see it as a larger image, once in a new tab, you can also click that image to enlarge it or shrink it. You could just click the image in the forum as well, but then you would have to click your browser's back button to see the forum post again.
1.) Use an image hosting website to easily upload your image(s) to that, where you get a web link (url address) for an image. On "postimages.org", if you upload a single image, a list of image location web addresses (urls) are automatically listed, (if you upload multiple images at one time, you can click the "share" button on each image to see that image's location web addresses list), then click the button at the far right of "Direct Link" to copy the image's location link, which you then paste back into your forum post or reply using the "rimg" button (remote image button), located on top at the upper right. Position your cursor in your message where you want the image, click the "rimg" button in toolbar of forum message, then right click & paste your image's web link (url), or paste the image's web link, then highlight the link, and then click the "rimg" button. After saving your post or reply, the image(s) will appear.
This has the advantage of not having to edit the image to shrink it (scale or resize), and to save the image(s) into a compressed image format like "jpeg" or "jpg". There are numerous free image hosting websites, like: postimages.org, imgur, tinypic, etc... I would recommend that you create a free account on one of these websites, so that your images are retained and are known to be yours rather then being "generic". I use "postimages.org" the most.
PostImages.org - showing the various location links available for an image
* Apparently "postimage.org" became "postimages.org", so a lot of my previous links to images in all my posts and replies have been broken (the location of the images changed).
In the code box below is an example of how your remote image link should look like when posting or replying in this forum.
Postimage.org — free image hosting / image upload
https://postimages.org/
Code: Select all
[rimg]https://s5.postimg.cc/dvn0g5jif/Post_Image_1.jpg[/rimg]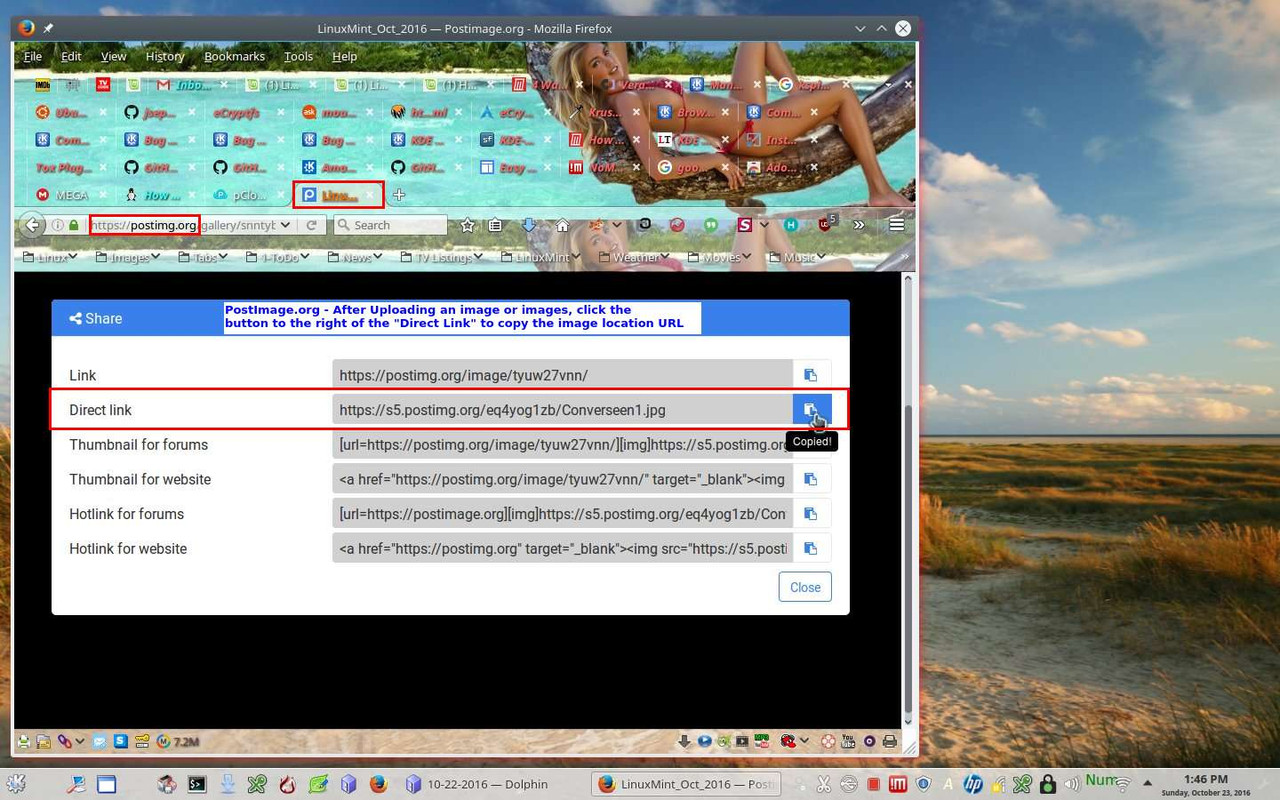
These methods below require you to edit the images until their sizes are below 98kb in size which can then be uploaded directly into the forum as attachment files. You are limited to 3 images using this method. I will usually have my file manager open and in my "Pictures/ScreenShots" folder, so that I can click the file manager and quickly verify that the images are below 98 kb in size. Once you have done this, it becomes relatively easy to do from then on.
2.) You can install and use the superb "Converseen" image program in the Software Manager or Synaptic Package Manager (SPM). This image program can easily and quickly edit one or more images at one time.
Converseen's website
http://converseen.fasterland.net/download-for-linux/
To install this using the PPA method, open a console terminal, type in, or copy & paste, each line below one by one:
sudo add-apt-repository ppa:ubuntuhandbook1/apps
sudo apt-get update
sudo apt-get install converseen
Bring up "Converseen", click add images in toolbar, file browse to select your images, click "check all" to process all images, now on the left side, Under "Dimensions", check "Scale", click "maintain aspect ratio", change the width or height ratio to something like 80%, click tab button and the other will change automatically to that 80% size, under output options check "Image's Directory" & check "Rename", then on the lower right click "Convert to" and choose "JPG", then click the "Images Settings" button, change the "Jpeg" Compression level to 50% quality, click ok in that box, then click the "Convert" button at the top, and it will quickly convert those images to smaller images that you can upload directly to the forum. Using the settings I mentioned, the smaller converted images will have the word "copy" in it. The "Convert To" and image compression values will stay the same even after closing the program for the next time you use it, but you will probably have to simply change the other values each time you run it.
"Converseen" - highlighting the various portions of this wonderful program that need to be set.

My File Manager before converting images with "Converseen"

My File Manager after converting images with "Converseen"

3.) Install and use one of the many image editors, like Gimp, or KolourPaint, Pinta, etc... I find that the excellent "Kolourpaint" application is the easiest and fasted basic image editor. In addition to making it easy to resize and re-scale an image, these programs also allow you to edit the image to highlight areas of interest, add text overlays, etc..., and to save them, or export them, easily into the ".jpg" or ".jpeg" compressed image format using around 50% quality or 50% compression which can then be upload easily to the forum.
Using "KolourPaint" to shrink an image to fit this forum: Bring up "KolourPaint", click open to select an image, then click "image" in the toolbar, click "Resize/Scale", click "Smooth Scale", click "Keep Aspect Ratio", change Width or Height "Percentage" to 80% or less, click "File" in toolbar, "Export", change "Filter" to "Jpeg Image", change "Quality" to 50%-60%, type in an image name with the correct extension type, like "image.jpg" or "image.jpeg" (auto), then click "Save". Check your new image's file size using your file manager to see that it is below 98kb to upload to the forum. If it is not, you can click on "KolourPaint", click "File", "Export", lower the "Quality" a little more, and save it again until it is small enough for the forum. If you have a really large image, you can also reduce the "Smooth Scale" percentage, under Image - Resize Scale options, to something lower than 80% before exporting it.
"KolourPaint" - screenshot 1

"KolourPaint" - screenshot 2

"KolourPaint" - screenshot 3

Hope this helps ...