LM 20 xfce custom folder icons in thunar

Write tutorials for Linux Mint here
More tutorials on https://github.com/orgs/linuxmint/discu ... /tutorials and (archive) on https://community.linuxmint.com/tutorial
Forum rules
Don't add support questions to tutorials; start your own topic in the appropriate sub-forum instead. Before you post read forum rules
Post Reply
User avatar
secureIT
Level 4
Level 4
Posts: 471
Joined: Wed Dec 05, 2018 1:26 pm

LM 20 xfce custom folder icons in thunar

Post by secureIT »

In LM Xfce 19.3 we was on ubuntu 18.04 and on thunar 1.6.15.

Now, that we are on LM 20 xfce and on thunar 1.8.14 ... we are able to show custom folder icons in thunar.
(Might be useful for music-collections - or image-collections ... e.g.)

As shown on the xfce4 website we will need two scripts to do it.

I will show you the way i got it to work (without the use of terminal)

1. open up thunar and create a folder in your home-directory and name it like "mythunarfiles" (without quotes) ... or whatever you want.

2. open up xed and copy the first script to it :

Code: Select all

#!/bin/bash
 
convert -thumbnail "$1" "$2/folder.jpg" "$3" 1>/dev/null 2>&1 ||\
convert -thumbnail "$1" "$2/.folder.jpg" "$3" 1>/dev/null 2>&1 ||\
rm -f "$HOME/.cache/thumbnails/normal/$(echo -n "$4" | md5sum | cut -d " " -f1).png" ||\
rm -f "$HOME/.thumbnails/normal/$(echo -n "$4" | md5sum | cut -d " " -f1).png" ||\
rm -f "$HOME/.cache/thumbnails/large/$(echo -n "$4" | md5sum | cut -d " " -f1).png" ||\
rm -f "$HOME/.thumbnails/large/$(echo -n "$4" | md5sum | cut -d " " -f1).png" ||\
exit 1
3. save the script as :

Code: Select all

folder-thumbnailer 
to the folder home/yourname/mythunarfiles

4. now copy the second script to xed :

Code: Select all

[Thumbnailer Entry]
Version=1.0
Encoding=UTF-8
Type=X-Thumbnailer
Name=Folder Thumbnailer
MimeType=inode/directory;
Exec=/usr/bin/folder-thumbnailer %s %i %o %u
5. save the script as :

Code: Select all

folder.thumbnailer 
to the folder home/yourname/mythunarfiles

Open up thunar and

home/yourname/mythunarfiles

Open up a new thunar window

6. navigate to > filesystem > usr > bin

7. make a right click on the folder and choose "open as root"

8. Drag and drop the file

Code: Select all

folder-thumbnailer
from the thunar-window home/yourname/mythunarfiles to the window /usr/bin (which is now opened with root-privilegues.)

9. now do a right click on the file folder-thumbnailer (that now sits in /usr/bin/
and choose > Properties> Access rights and mark: "File can be started as a program"

10. close the Folder

11. navigate to > filesystem > usr > share > thumbnailers.

12. now do a right click on the folder and choose "open as root"

12. Drag and drop the file

Code: Select all

folder.thumbnailer
from the thunar-window home/yourname/mythunarfiles to the window /usr/share/thumbnailers (which is now opened with root-privilegues.)

13. now do a right click on the folder.thumbnailer (that now sits in /usr/share/thumbnailers
and choose > Properties> Access rights and mark: "File can be started as a program"

14. close the folder.

15. Very important :

to get it to work : you must install imagemagick

Code: Select all

apt install imagemagick
16. Now restart the system

17. And now restarted :
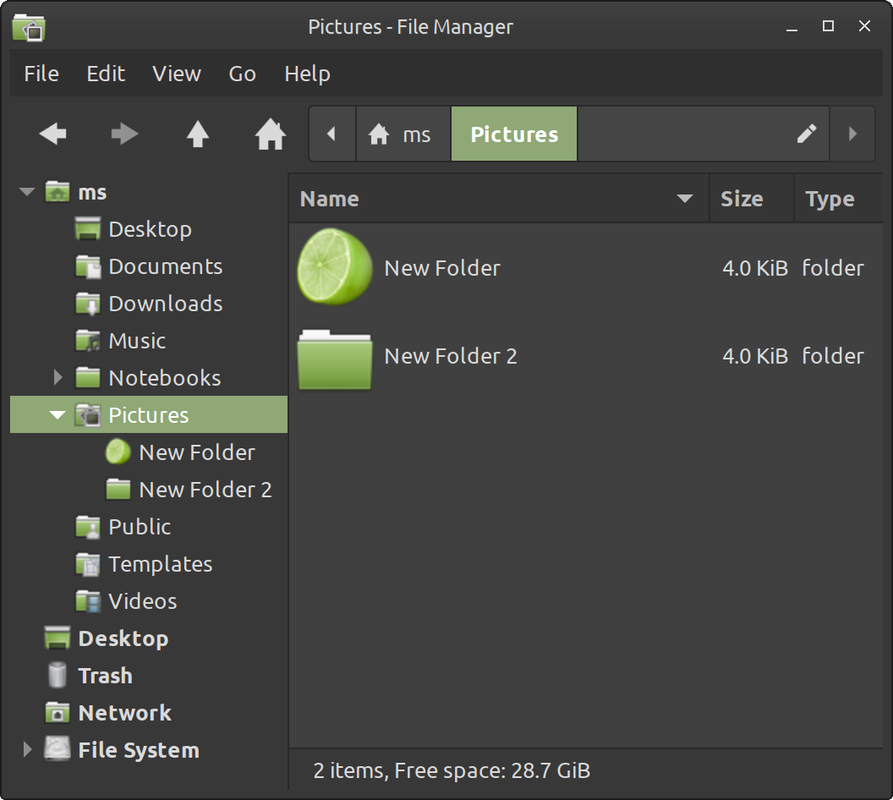
...... if you place a jpg-image with the name :
folder.jpg
or
.folder.jpg
into a folder ..... the folder icon will show it .

And if you delete the file thunar will show the "normal" file icon again ...
.
User avatar
absque fenestris
Level 12
Level 12
Posts: 4110
Joined: Sat Nov 12, 2016 8:42 pm
Location: Confoederatio Helvetica

Re: LM 20 xfce custom folder icons in thunar

Post by absque fenestris »

Hi secureIT
I modified Thunar according to your instructions, but was not entirely satisfied with the jpg display (no alpha channel).
So I quickly replaced folder.jpg in the folder-thumbnailer script with folder.png - and lo and behold, it works ...

Image
User avatar
secureIT
Level 4
Level 4
Posts: 471
Joined: Wed Dec 05, 2018 1:26 pm

Re: LM 20 xfce custom folder icons in thunar

Post by secureIT »

Hi, absque fenestris

The look of the .jpg-icons was o.k. for me (see screenshot)

But you are right : if one is more satisfied with .png-icons, he can do it with them by renaming the file-name of the icon to folder.png
And by the way : for this, the script does not have to be changed.

Image

Image
.
User avatar
NM64
Level 4
Level 4
Posts: 245
Joined: Sat Feb 04, 2017 11:34 pm

Re: LM 20 xfce custom folder icons in thunar

Post by NM64 »

Apologies for the bump but I wanted to put together a quick sort of condensed "tl;dr" for people like myself that are already familiar with how to navigate the Xfce GUI but just need a quick refresher on how to get custom folder icons working.

Step #1 - folder-thumbnailer
Open a new blank text file and paste the following text into it:

Code: Select all

#!/bin/bash

convert -thumbnail "$1" "$2/folder.jpg" "$3" 1>/dev/null 2>&1 ||\
convert -thumbnail "$1" "$2/.folder.jpg" "$3" 1>/dev/null 2>&1 ||\
rm -f "$HOME/.cache/thumbnails/normal/$(echo -n "$4" | md5sum | cut -d " " -f1).png" ||\
rm -f "$HOME/.thumbnails/normal/$(echo -n "$4" | md5sum | cut -d " " -f1).png" ||\
rm -f "$HOME/.cache/thumbnails/large/$(echo -n "$4" | md5sum | cut -d " " -f1).png" ||\
rm -f "$HOME/.thumbnails/large/$(echo -n "$4" | md5sum | cut -d " " -f1).png" ||\
exit 1
...and save it as (do not include a file extension):

Code: Select all

folder-thumbnailer
...and put it in the following location (you may need to open the folder as root):

Code: Select all

/usr/bin
...then right-click on the 'folder-thumbnailer' file, go to "Properties" -> "Permissions" tab, and enable "Allow this file to run as a program" (this step may also require root)


PROTIP: You can very easily add support for alternative file names or even additional file extensions; for example, to add folder icon support for not only the "$ folder" filename but also support for the ".png" and ".jpeg" (with an 'e') file extension, add the following additional lines directly below the initial #!/bin/bash line in the folder-thumbnailer file:

Code: Select all

convert -thumbnail "$1" "$2/$ folder.png" "$3" 1>/dev/null 2>&1 ||\
convert -thumbnail "$1" "$2/.$ folder.png" "$3" 1>/dev/null 2>&1 ||\
convert -thumbnail "$1" "$2/folder.png" "$3" 1>/dev/null 2>&1 ||\
convert -thumbnail "$1" "$2/.folder.png" "$3" 1>/dev/null 2>&1 ||\
convert -thumbnail "$1" "$2/$ folder.jpeg" "$3" 1>/dev/null 2>&1 ||\
convert -thumbnail "$1" "$2/.$ folder.jpeg" "$3" 1>/dev/null 2>&1 ||\
convert -thumbnail "$1" "$2/folder.jpeg" "$3" 1>/dev/null 2>&1 ||\
convert -thumbnail "$1" "$2/.folder.jpeg" "$3" 1>/dev/null 2>&1 ||\
convert -thumbnail "$1" "$2/$ folder.jpg" "$3" 1>/dev/null 2>&1 ||\
convert -thumbnail "$1" "$2/.$ folder.jpg" "$3" 1>/dev/null 2>&1 ||\


Step #2 - folder.thumbnailer
Open another new blank text file and paste the following text into it:

Code: Select all

[Thumbnailer Entry]
Version=1.0
Encoding=UTF-8
Type=X-Thumbnailer
Name=Folder Thumbnailer
MimeType=inode/directory;
Exec=/usr/bin/folder-thumbnailer %s %i %o %u
...and save it as (do not include a file extension... unless ".thumbnailler" is considered as the file extension):

Code: Select all

folder.thumbnailer
...and put it in the following location (once again, you may need to open the folder as root):

Code: Select all

/usr/share/thumbnailers
...then right-click on the 'folder.thumbnailer' file, go to "Properties" -> "Permissions" tab, and enable "Allow this file to run as a program" (this step may also require root)


Step #3 - imagemagick
In your package manager, search for and install the following package (and presumably any additional packages that it recommends you to also install):

Code: Select all

imagemagick
...then restart your computer (it's theoretically possible that you only need to log out and log back in, but I haven't tested this)


Step #4 - Enjoy
Now any image named "folder.jpg" (even if the file is actually a PNG or the like) will show up as a thumbnail for the folder containing the aforementioned "folder.jpg"
CPU: Xeon E3-1246 v3 (4c/8t Haswell/Intel 4th gen) — core & cache @ 3.9GHz via multicore enhancement
GPU: Intel integrated HD Graphics P4600
RAM: 4x8GB Corsair Vengence @ DDR3-1600
OS: Linux Mint 20.3 Xfce + [VM] Win7 SP1 x64 
Post Reply

Return to “Tutorials”