How to share your Linux Mint System Information

Quick to answer questions about finding your way around Linux Mint as a new user.
Forum rules
There are no such things as "stupid" questions. However if you think your question is a bit stupid, then this is the right place for you to post it. Stick to easy to-the-point questions that you feel people can answer fast. For long and complicated questions use the other forums in the support section.
Before you post read how to get help. Topics in this forum are automatically closed 6 months after creation.
Locked
User avatar
karlchen
Level 23
Level 23
Posts: 18222
Joined: Sat Dec 31, 2011 7:21 am
Location: Germany

How to share your Linux Mint System Information

Post by karlchen »

Topic: How to share your Linux Mint System Information
Applies to: LM 19.2 and above
Intended audience: primarily new users of Linux Mint

Providing system information:

Frequently, when you report technical problems, which affect your Linux Mint system, and ask for help, you will be requested to provide your "System Information".
In most cases, users asking for your system information will, however, not use this term, system information, but they will ask you to post an inxi output instead. Both terms actually mean the same thing.

How to create and share your System Information:

Linux Mint 19.3 makes creating and sharing your System Information very easy, even if executing commandlines is not your favourite passtime. The Linux Mint application "System Reports" can be used to do the work for you, and you do not have to type any terminal commandline yourself.
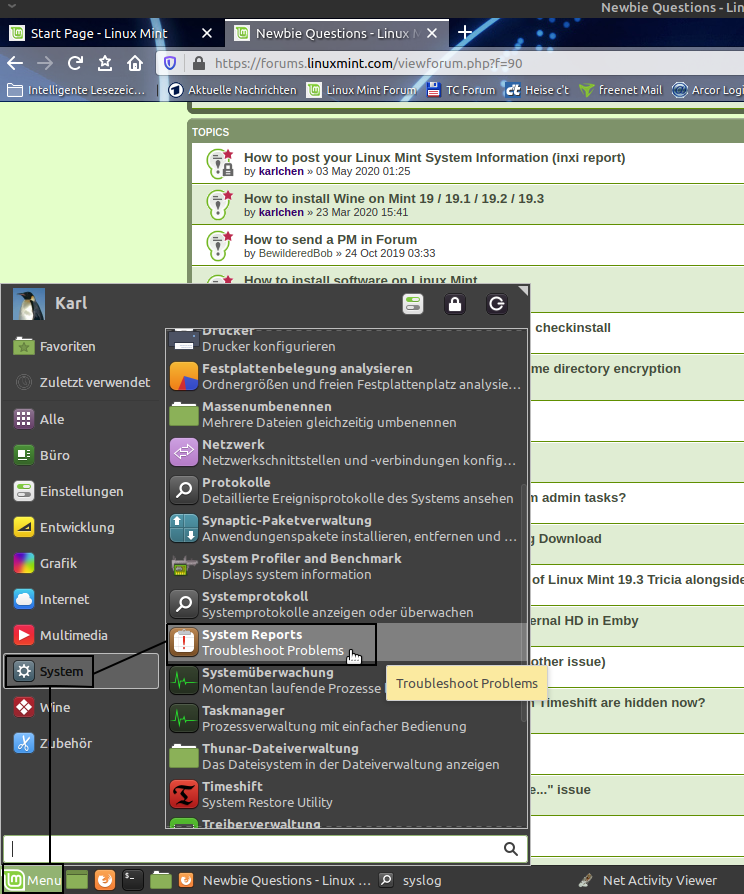
  1. Launch "System Reports" from the Mint application menu.

    Image
    (Click screenshot to enlarge. Press <Alt><Cursor Left> to return here.)

    Click on the Mint menu icon. Click on the "System" Category. Locate the menu item "System Reports" and click on it in order to launch it.
    Note, please:
    Depending on your desktop environment (Cinnamon, Mate, xfce) the "System" category might be named "Administration" instead.
    .
  2. Launch System Reports => System Information

    "System Reports" will launch. This may take a few seconds, in particular on slow machines.
    The first thing, which "System Reports" will do is checking your system for issues, which require your attention.
    Because we want to create and share your System Information, however, we will ignore the results, displayed as "Detected problems", if any, for the moment.

    Image
    (Click screenshot to enlarge. Press <Alt><Cursor Left> to return here.)

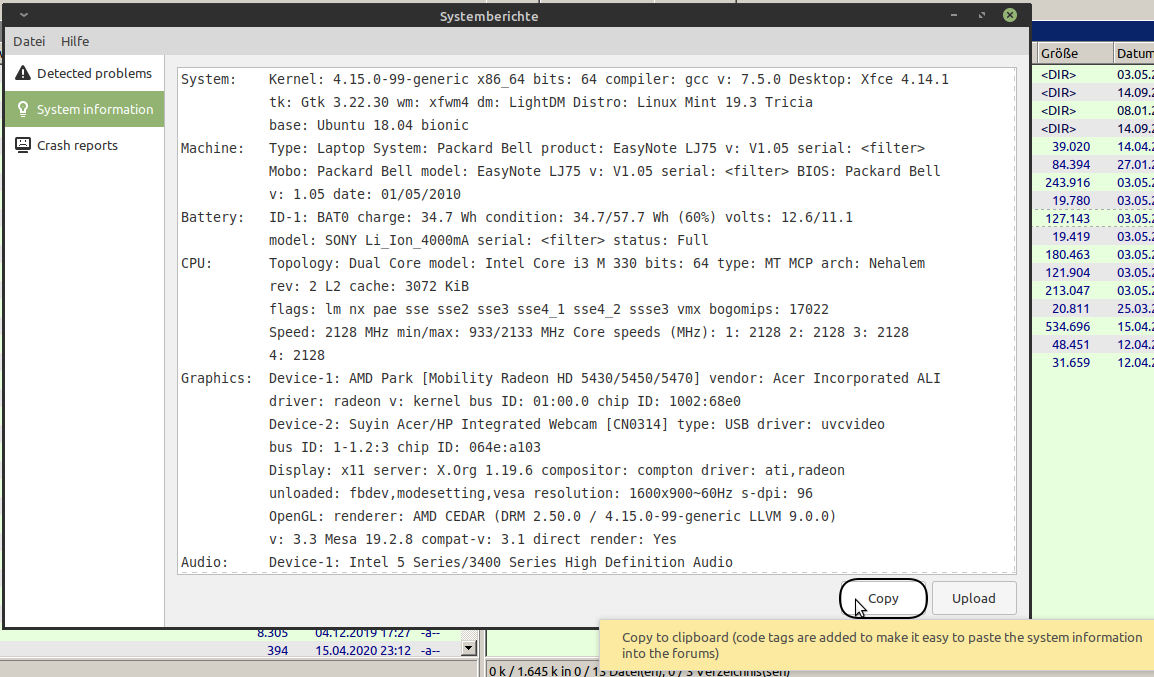
    Click on "System Information".
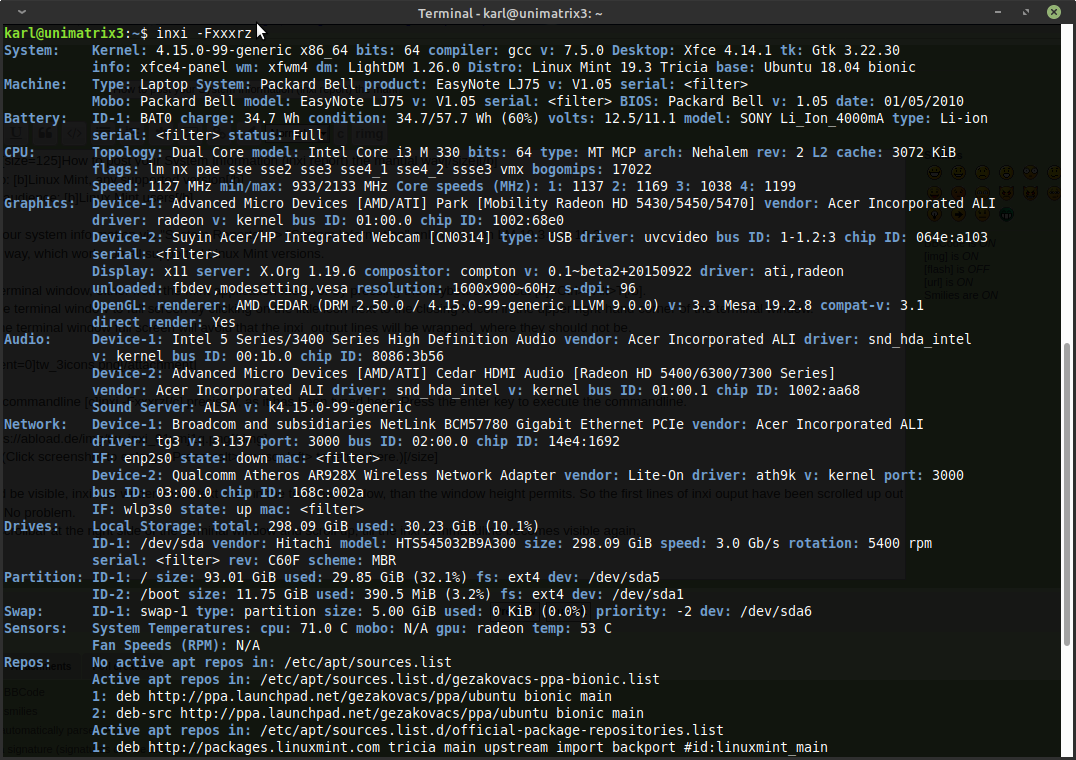
    .
  3. Upload your System Information

    Your System Information will be displayed almost immediately, after clicking on "System Information".
    (inxi has executed this commandline for you: inxi -Fxxrzc0)

    Image
    (Click screenshot to enlarge. Press <Alt><Cursor Left> to return here.)

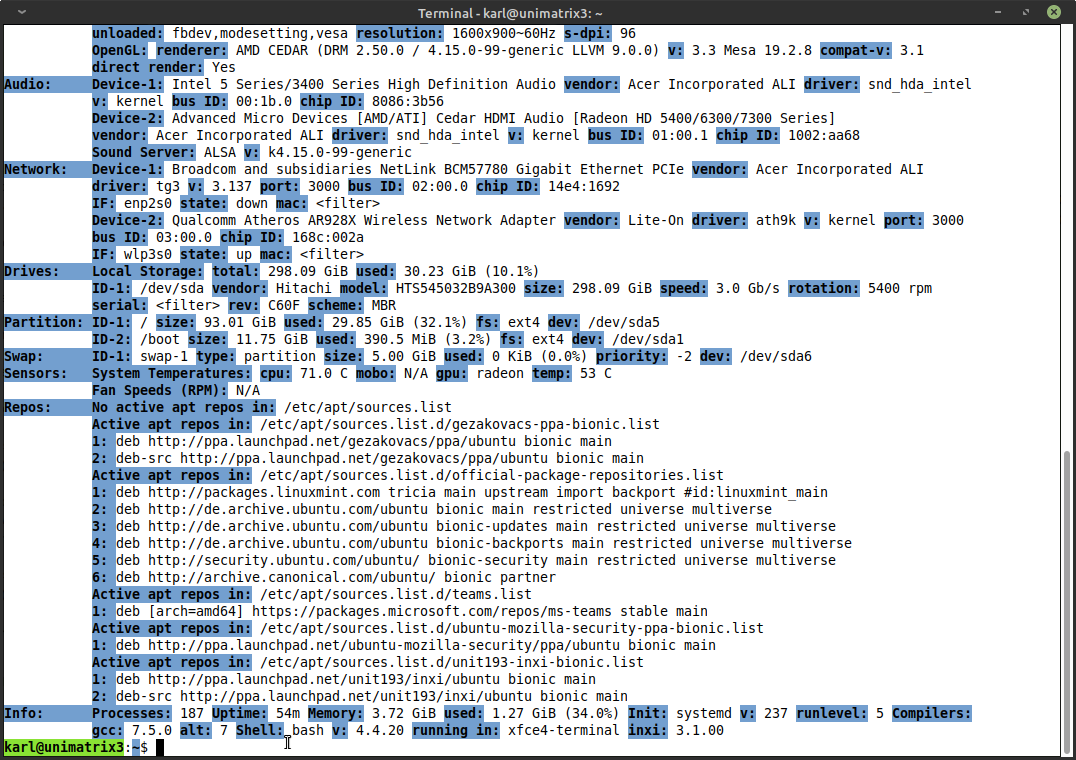
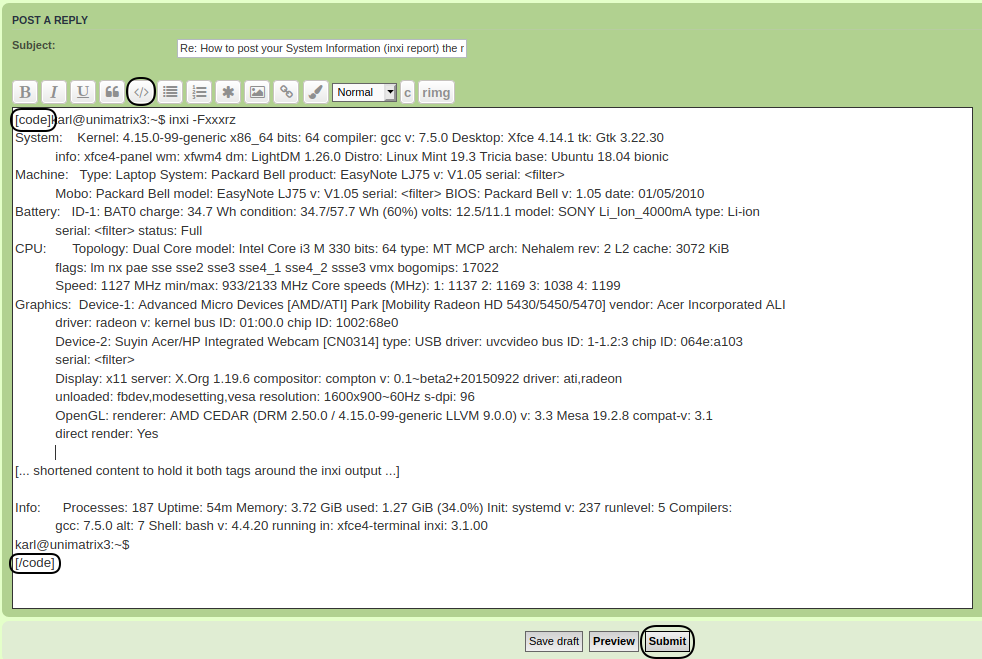
    You can scroll through the whole inxi report and check the details, before proceeding.
    When ready to do so, click on the [Copy] button in the lower right-hand corner of the application window.

    [Copy] will copy the complete System Information into your clipboard and enclose it in [code] .. [/code] tags.
    These tags will tell the forum editor to preserve proper screen formatting, which will make reading the output easier.
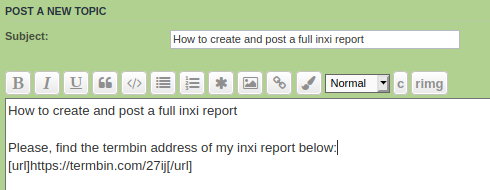
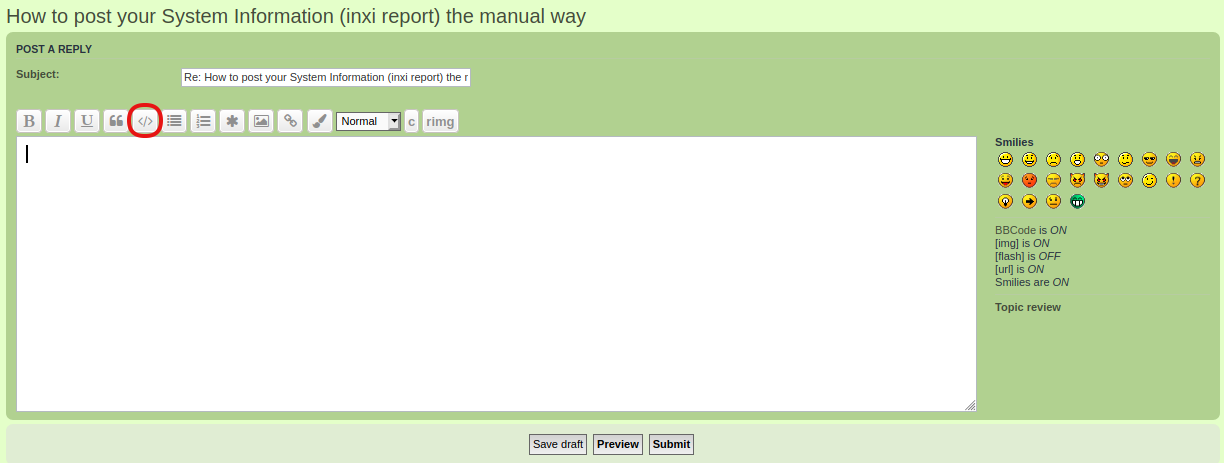
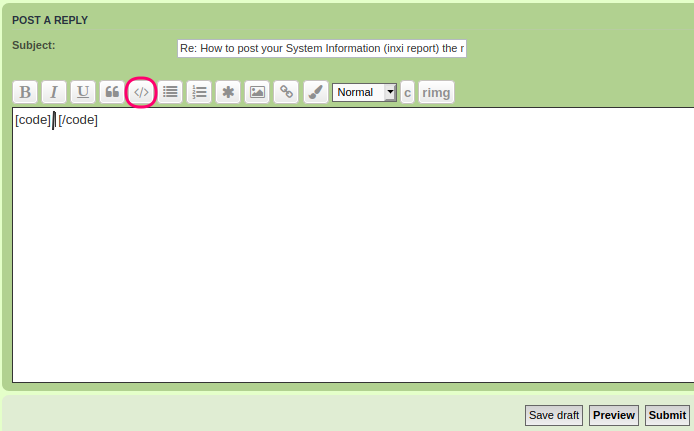
    .
  4. Paste your System Information into your next post:

    Put your cursor into your next forum post. Press <Ctrl>V in order to paste the content of your clipboard into the post.
    Then click on the [Submit] button.

    Image
    (Click screenshot to enlarge. Press <Alt><Cursor Left> to return here.)

    Done. You have submitted your System Information successfully.

What the forum users will read:

Below is the complete System Information output, which forum users will read, and what it will look like:

Code: Select all

System:    Kernel: 4.15.0-99-generic x86_64 bits: 64 compiler: gcc v: 7.5.0 Desktop: Xfce 4.14.1 
           tk: Gtk 3.22.30 wm: xfwm4 dm: LightDM Distro: Linux Mint 19.3 Tricia 
           base: Ubuntu 18.04 bionic 
Machine:   Type: Laptop System: Packard Bell product: EasyNote LJ75 v: V1.05 serial: <filter> 
           Mobo: Packard Bell model: EasyNote LJ75 v: V1.05 serial: <filter> BIOS: Packard Bell 
           v: 1.05 date: 01/05/2010 
Battery:   ID-1: BAT0 charge: 34.7 Wh condition: 34.7/57.7 Wh (60%) volts: 12.5/11.1 
           model: SONY Li_Ion_4000mA serial: <filter> status: Full 
CPU:       Topology: Dual Core model: Intel Core i3 M 330 bits: 64 type: MT MCP arch: Nehalem 
           rev: 2 L2 cache: 3072 KiB 
           flags: lm nx pae sse sse2 sse3 sse4_1 sse4_2 ssse3 vmx bogomips: 17022 
           Speed: 2128 MHz min/max: 933/2133 MHz Core speeds (MHz): 1: 2032 2: 2128 3: 2128 
           4: 2118 
Graphics:  Device-1: AMD Park [Mobility Radeon HD 5430/5450/5470] vendor: Acer Incorporated ALI 
           driver: radeon v: kernel bus ID: 01:00.0 chip ID: 1002:68e0 
           Device-2: Suyin Acer/HP Integrated Webcam [CN0314] type: USB driver: uvcvideo 
           bus ID: 1-1.2:3 chip ID: 064e:a103 
           Display: x11 server: X.Org 1.19.6 compositor: compton driver: ati,radeon 
           unloaded: fbdev,modesetting,vesa resolution: 1600x900~60Hz s-dpi: 96 
           OpenGL: renderer: AMD CEDAR (DRM 2.50.0 / 4.15.0-99-generic LLVM 9.0.0) 
           v: 3.3 Mesa 19.2.8 compat-v: 3.1 direct render: Yes 
Audio:     Device-1: Intel 5 Series/3400 Series High Definition Audio 
           vendor: Acer Incorporated ALI driver: snd_hda_intel v: kernel bus ID: 00:1b.0 
           chip ID: 8086:3b56 
           Device-2: AMD Cedar HDMI Audio [Radeon HD 5400/6300/7300 Series] 
           vendor: Acer Incorporated ALI driver: snd_hda_intel v: kernel bus ID: 01:00.1 
           chip ID: 1002:aa68 
           Sound Server: ALSA v: k4.15.0-99-generic 
Network:   Device-1: Broadcom and subsidiaries NetLink BCM57780 Gigabit Ethernet PCIe 
           vendor: Acer Incorporated ALI driver: tg3 v: 3.137 port: 3000 bus ID: 02:00.0 
           chip ID: 14e4:1692 
           IF: enp2s0 state: down mac: <filter> 
           Device-2: Qualcomm Atheros AR928X Wireless Network Adapter vendor: Lite-On 
           driver: ath9k v: kernel port: 3000 bus ID: 03:00.0 chip ID: 168c:002a 
           IF: wlp3s0 state: up mac: <filter> 
Drives:    Local Storage: total: 298.09 GiB used: 30.32 GiB (10.2%) 
           ID-1: /dev/sda vendor: Hitachi model: HTS545032B9A300 size: 298.09 GiB speed: 3.0 Gb/s 
           serial: <filter> 
Partition: ID-1: / size: 93.01 GiB used: 29.94 GiB (32.2%) fs: ext4 dev: /dev/sda5 
           ID-2: /boot size: 11.75 GiB used: 390.5 MiB (3.2%) fs: ext4 dev: /dev/sda1 
Swap:      ID-1: swap-1 type: partition size: 5.00 GiB used: 0 KiB (0.0%) priority: -2 
           dev: /dev/sda6 
USB:       Hub: 1-0:1 info: Full speed (or root) Hub ports: 3 rev: 2.0 chip ID: 1d6b:0002 
           Hub: 1-1:2 info: Intel Integrated Rate Matching Hub ports: 6 rev: 2.0 
           chip ID: 8087:0020 
           Device-1: 1-1.2:3 info: Suyin Acer/HP Integrated Webcam [CN0314] type: Video 
           driver: uvcvideo rev: 2.0 chip ID: 064e:a103 
           Hub: 2-0:1 info: Full speed (or root) Hub ports: 3 rev: 2.0 chip ID: 1d6b:0002 
           Hub: 2-1:2 info: Intel Integrated Rate Matching Hub ports: 8 rev: 2.0 
           chip ID: 8087:0020 
           Device-2: 2-1.4:3 info: Primax 0Y357C PMX-MMOCZUL (B) [Dell Laser Mouse] type: Mouse 
           driver: hid-generic,usbhid rev: 2.0 chip ID: 0461:4d51 
Sensors:   System Temperatures: cpu: 81.0 C mobo: N/A gpu: radeon temp: 52 C 
           Fan Speeds (RPM): N/A 
Repos:     No active apt repos in: /etc/apt/sources.list 
           Active apt repos in: /etc/apt/sources.list.d/gezakovacs-ppa-bionic.list 
           1: deb http: //ppa.launchpad.net/gezakovacs/ppa/ubuntu bionic main
           2: deb-src http: //ppa.launchpad.net/gezakovacs/ppa/ubuntu bionic main
           Active apt repos in: /etc/apt/sources.list.d/official-package-repositories.list 
           1: deb http: //packages.linuxmint.com tricia main upstream import backport #id:linuxmint_main
           2: deb http: //de.archive.ubuntu.com/ubuntu bionic main restricted universe multiverse
           3: deb http: //de.archive.ubuntu.com/ubuntu bionic-updates main restricted universe multiverse
           4: deb http: //de.archive.ubuntu.com/ubuntu bionic-backports main restricted universe multiverse
           5: deb http: //security.ubuntu.com/ubuntu/ bionic-security main restricted universe multiverse
           6: deb http: //archive.canonical.com/ubuntu/ bionic partner
           Active apt repos in: /etc/apt/sources.list.d/teams.list 
           1: deb [arch=amd64] https: //packages.microsoft.com/repos/ms-teams stable main
           Active apt repos in: /etc/apt/sources.list.d/ubuntu-mozilla-security-ppa-bionic.list 
           1: deb http: //ppa.launchpad.net/ubuntu-mozilla-security/ppa/ubuntu bionic main
           Active apt repos in: /etc/apt/sources.list.d/unit193-inxi-bionic.list 
           1: deb http: //ppa.launchpad.net/unit193/inxi/ubuntu bionic main
           2: deb-src http: //ppa.launchpad.net/unit193/inxi/ubuntu bionic main
Info:      Processes: 193 Uptime: 53m Memory: 3.72 GiB used: 1.19 GiB (32.0%) Init: systemd v: 237 
           runlevel: 5 Compilers: gcc: 7.5.0 alt: 7 Client: Unknown python3.6 client inxi: 3.1.00 
Last edited by karlchen on Tue Jun 13, 2023 6:02 pm, edited 3 times in total.
Image
The people of Alderaan have been bravely fighting back the clone warriors sent out by the unscrupulous Sith Lord Palpatine for 771 days now.
Lifeline
User avatar
karlchen
Level 23
Level 23
Posts: 18222
Joined: Sat Dec 31, 2011 7:21 am
Location: Germany

How to post your Linux Mint System Information via termbin

Post by karlchen »

Topic: How to post your Linux Mint System Information via termbin
Applies to: LM 19.2 and above
Intended audience: primarily new users of Linux Mint

Alternative approach:

Instead of copying the inxi report into your clipboard and pasting it into your next post, you can also make "System Reports" => "System Information" upload the inxi report to termbin.com. In this case "System Information" will copy the termbin upload address into your clipboard. You will submit this address in your next post for readers to click on and follow the termbin link to your inxi report.

Here is how this works:
  1. You follow steps 1. and
  2. 2., as explained in the post above.
  3. Upload the inxi report

    The inxi report will be displayed almost immediately, after clicking on "System Information". - inxi has executed this commandline for you: inxi -Fxxrzc0

    Image
    (Click screenshot to enlarge. Press <Alt><Cursor Left> to return here.)

    You can scroll through the whole inxi report and check the details, before uploading it to termbin.com.
    When ready to do so, click on the [Upload] button in the lower right-hand corner of the application window.

    After you have clicked on the [Upload] button, it may take a few seconds, till a notification popup in the upper right-hand corner of your screen will inform you that your inxi report has been uploaded to termbin.com and that the URL address to the uploaded inxi report has been copied into your clipboard.

    (In my example the termbin.com address is https://termbin.com/27ij)
    .
  4. Paste the termbin address into your next post:

    Image
    (Click screenshot to enlarge. Press <Alt><Cursor Left> to return here.)

    Paste the termbin address into your next post. Click on the [Submit] button to submit your post.
    Done. You have submitted your inxi report successfully.

What the forum users will read:

Below is the inxi report, which forum users will read, who click on the submitted link https://termbin.com/27ij.
Note: the lower part of the inxi report is not visible in the screenshot below, but of course the browser will permit scrolling through the whole report.

Image
(Click screenshot to enlarge. Press <Alt><Cursor Left> to return here.)
Last edited by karlchen on Wed May 06, 2020 2:16 pm, edited 1 time in total.
Image
The people of Alderaan have been bravely fighting back the clone warriors sent out by the unscrupulous Sith Lord Palpatine for 771 days now.
Lifeline
User avatar
zcot
Level 9
Level 9
Posts: 2838
Joined: Wed Oct 19, 2016 6:08 pm

Re: How to post your Linux Mint System Information

Post by zcot »

Topic: How to post your System Information using upload-system-info
Applies to: Linux Mint, any supported version
Intended audience: Linux Mint users

Additionally, and we use this a lot on IRC, is using the terminal command: upload-system-info (open a terminal, type the command, press ENTER)

This is all the same inxi report as above.

It will issue the inxi command and pipe it to the termbin webpage, then proceed to open a browser page for you and show you the posted web page about your system.

Then, you could use either method mentioned above (info or URL) to share that info in a forum post.
User avatar
all41
Level 19
Level 19
Posts: 9520
Joined: Tue Dec 31, 2013 9:12 am
Location: Computer, Car, Cage

Re: How to post your Linux Mint System Information

Post by all41 »

+1 karlchen for posting this
imho inxi should be referenced as an inquiry, not as a report
Cheers
Everything in life was difficult before it became easy.
User avatar
karlchen
Level 23
Level 23
Posts: 18222
Joined: Sat Dec 31, 2011 7:21 am
Location: Germany

How to post your System Information (inxi report) the manual way

Post by karlchen »

Topic: How to post your System Information (inxi report) the manual way
Applies to: Linux Mint, any supported version
Intended audience: Linux Mint users

Posting your system information via "System Reports" => "System Information" only works on LM 19.3 and 19.2 and above.
Here is a way, which works on all supported Linux Mint versions.
  1. Open a terminal window, either from the Mint application menu or by pressing the keyboard shortcut <Ctrl><Alt>T.
    Resize the terminal window to full screen by clicking on the little icon next to the closing X icon in the upper right-hand corner of the terminal window.
    Making the terminal window full screen will avoid that the inxi output lines will be wrapped, where they should not be.
    tw_3icons.png
    tw_3icons.png (7.22 KiB) Viewed 45003 times
  2. Type the commandline inxi -Fxxxrz precisely, as it has been typed here. Press the enter key to execute the commandline.

    Image
    (Click screenshot to enlarge. Press <alt><cursor left> to return here.)

    As should be visible, inxi has written more text lines in the terminal window, than the window height permits. So the first lines of inxi ouput have been scrolled up out of view. - No problem.
    .
  3. Use the the slider in scrollbar at the right side of the terminal window and scroll up, till the inxi commandline becomes visible again.

    Image
    (Click screenshot to enlarge. Press <alt><cursor left> to return here.)
  4. Now mark the inxi commandline and the complete text output, which it has displayed, with your mouse.

    Image
    (Click screenshot to enlarge. Press <alt><cursor left> to return here.)
    .
  5. Next press the keyboard shortcut <Ctrl><Shift>C in order to copy the whole marked text into your clipboard.
    .
  6. Switch to your browser and to your post, where you want to insert your inxi output.
    Click on [Post Reply]
    tw_inxi_04.png
    tw_inxi_04.png (5.03 KiB) Viewed 44997 times
    Image
    (Click screenshot to enlarge. Press <alt><cursor left> to return here.)
    .
  7. First click inside the editor area once to position the cursor. Next click on the [</>] icon.
    Doing so will insert a pair of tags at the cursor positition: [code] [/code]. These are the so-called [code] tags.
    Click between the 2 tags, not on, but really between the tags now.

    Image
    (Click screenshot to enlarge. Press <alt><cursor left> to return here.)
    .
  8. Then press the keyboard shortcut <Ctrl>V in order to paste the clipboard content into the forum editor between the tags.

    Image
    (Click screenshot to enlarge. Press <alt><cursor left> to return here.)
    .
    Click the [Submit] button in order to submit your inxi report.
    .
  9. Below you will see what the sample inxi report (system information) looks like in your browser.

    Code: Select all

    karl@unimatrix3:~$ inxi -Fxxxrz
    System:    Kernel: 4.15.0-99-generic x86_64 bits: 64 compiler: gcc v: 7.5.0 Desktop: Xfce 4.14.1 tk: Gtk 3.22.30 
               info: xfce4-panel wm: xfwm4 dm: LightDM 1.26.0 Distro: Linux Mint 19.3 Tricia base: Ubuntu 18.04 bionic 
    Machine:   Type: Laptop System: Packard Bell product: EasyNote LJ75 v: V1.05 serial: <filter> 
               Mobo: Packard Bell model: EasyNote LJ75 v: V1.05 serial: <filter> BIOS: Packard Bell v: 1.05 date: 01/05/2010 
    Battery:   ID-1: BAT0 charge: 34.7 Wh condition: 34.7/57.7 Wh (60%) volts: 12.5/11.1 model: SONY Li_Ion_4000mA type: Li-ion 
               serial: <filter> status: Full 
    CPU:       Topology: Dual Core model: Intel Core i3 M 330 bits: 64 type: MT MCP arch: Nehalem rev: 2 L2 cache: 3072 KiB 
               flags: lm nx pae sse sse2 sse3 sse4_1 sse4_2 ssse3 vmx bogomips: 17022 
               Speed: 1127 MHz min/max: 933/2133 MHz Core speeds (MHz): 1: 1137 2: 1169 3: 1038 4: 1199 
    Graphics:  Device-1: Advanced Micro Devices [AMD/ATI] Park [Mobility Radeon HD 5430/5450/5470] vendor: Acer Incorporated ALI 
               driver: radeon v: kernel bus ID: 01:00.0 chip ID: 1002:68e0 
               Device-2: Suyin Acer/HP Integrated Webcam [CN0314] type: USB driver: uvcvideo bus ID: 1-1.2:3 chip ID: 064e:a103 
               serial: <filter> 
               Display: x11 server: X.Org 1.19.6 compositor: compton v: 0.1~beta2+20150922 driver: ati,radeon 
               unloaded: fbdev,modesetting,vesa resolution: 1600x900~60Hz s-dpi: 96 
               OpenGL: renderer: AMD CEDAR (DRM 2.50.0 / 4.15.0-99-generic LLVM 9.0.0) v: 3.3 Mesa 19.2.8 compat-v: 3.1 
               direct render: Yes 
    Audio:     Device-1: Intel 5 Series/3400 Series High Definition Audio vendor: Acer Incorporated ALI driver: snd_hda_intel 
               v: kernel bus ID: 00:1b.0 chip ID: 8086:3b56 
               Device-2: Advanced Micro Devices [AMD/ATI] Cedar HDMI Audio [Radeon HD 5400/6300/7300 Series] 
               vendor: Acer Incorporated ALI driver: snd_hda_intel v: kernel bus ID: 01:00.1 chip ID: 1002:aa68 
               Sound Server: ALSA v: k4.15.0-99-generic 
    Network:   Device-1: Broadcom and subsidiaries NetLink BCM57780 Gigabit Ethernet PCIe vendor: Acer Incorporated ALI 
               driver: tg3 v: 3.137 port: 3000 bus ID: 02:00.0 chip ID: 14e4:1692 
               IF: enp2s0 state: down mac: <filter> 
               Device-2: Qualcomm Atheros AR928X Wireless Network Adapter vendor: Lite-On driver: ath9k v: kernel port: 3000 
               bus ID: 03:00.0 chip ID: 168c:002a 
               IF: wlp3s0 state: up mac: <filter> 
    Drives:    Local Storage: total: 298.09 GiB used: 30.23 GiB (10.1%) 
               ID-1: /dev/sda vendor: Hitachi model: HTS545032B9A300 size: 298.09 GiB speed: 3.0 Gb/s rotation: 5400 rpm 
               serial: <filter> rev: C60F scheme: MBR 
    Partition: ID-1: / size: 93.01 GiB used: 29.85 GiB (32.1%) fs: ext4 dev: /dev/sda5 
               ID-2: /boot size: 11.75 GiB used: 390.5 MiB (3.2%) fs: ext4 dev: /dev/sda1 
    Swap:      ID-1: swap-1 type: partition size: 5.00 GiB used: 0 KiB (0.0%) priority: -2 dev: /dev/sda6 
    Sensors:   System Temperatures: cpu: 71.0 C mobo: N/A gpu: radeon temp: 53 C 
               Fan Speeds (RPM): N/A 
    Repos:     No active apt repos in: /etc/apt/sources.list 
               Active apt repos in: /etc/apt/sources.list.d/gezakovacs-ppa-bionic.list 
               1: deb http://ppa.launchpad.net/gezakovacs/ppa/ubuntu bionic main
               2: deb-src http://ppa.launchpad.net/gezakovacs/ppa/ubuntu bionic main
               Active apt repos in: /etc/apt/sources.list.d/official-package-repositories.list 
               1: deb http://packages.linuxmint.com tricia main upstream import backport #id:linuxmint_main
               2: deb http://de.archive.ubuntu.com/ubuntu bionic main restricted universe multiverse
               3: deb http://de.archive.ubuntu.com/ubuntu bionic-updates main restricted universe multiverse
               4: deb http://de.archive.ubuntu.com/ubuntu bionic-backports main restricted universe multiverse
               5: deb http://security.ubuntu.com/ubuntu/ bionic-security main restricted universe multiverse
               6: deb http://archive.canonical.com/ubuntu/ bionic partner
               Active apt repos in: /etc/apt/sources.list.d/teams.list 
               1: deb [arch=amd64] https://packages.microsoft.com/repos/ms-teams stable main
               Active apt repos in: /etc/apt/sources.list.d/ubuntu-mozilla-security-ppa-bionic.list 
               1: deb http://ppa.launchpad.net/ubuntu-mozilla-security/ppa/ubuntu bionic main
               Active apt repos in: /etc/apt/sources.list.d/unit193-inxi-bionic.list 
               1: deb http://ppa.launchpad.net/unit193/inxi/ubuntu bionic main
               2: deb-src http://ppa.launchpad.net/unit193/inxi/ubuntu bionic main
    Info:      Processes: 187 Uptime: 54m Memory: 3.72 GiB used: 1.27 GiB (34.0%) Init: systemd v: 237 runlevel: 5 Compilers: 
               gcc: 7.5.0 alt: 7 Shell: bash v: 4.4.20 running in: xfce4-terminal inxi: 3.1.00 
    karl@unimatrix3:~$ 
    
Congratulation. You have manually created and submitted your inxi report (system information) successfully.
Image
The people of Alderaan have been bravely fighting back the clone warriors sent out by the unscrupulous Sith Lord Palpatine for 771 days now.
Lifeline
Locked

Return to “Beginner Questions”